2024/02/05更新:如果從ESP32_CAM抓到的照片有毀損,出現image file is truncated (13 bytes not processed)訊息的處理方式。
在之前的「利用Python讀取LCD上的位元數字(Digit number) 」一文裡,因為ESP32_CAM還沒到貨的關係,我先利用手機拍下的照片來撰寫讓Python讀取位元數字的程式碼,本以為ESP32_CAM到貨之後把分析影像的來源改成ESP32_CAM就可以收工了,好傻好天真,整個程式幾乎翻一遍,只好另開一篇新文章。
在這裡會講幾件事情
- ESP32_CAM硬體的架設
- Python程式碼的修改
- Home Assistant的接入
ESP32_CAM硬體的架設
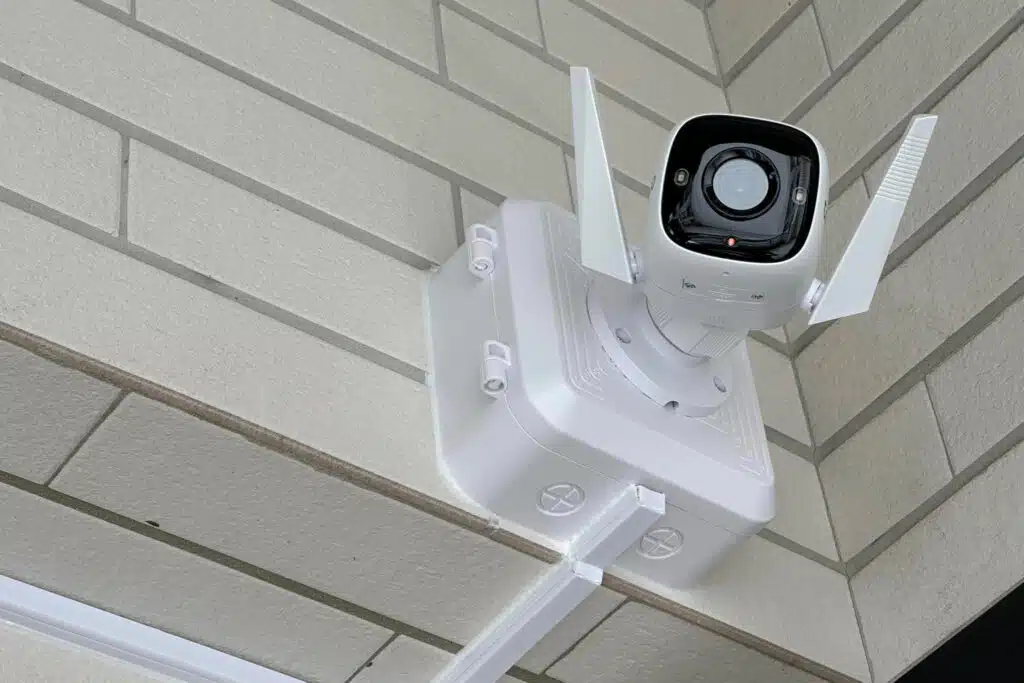
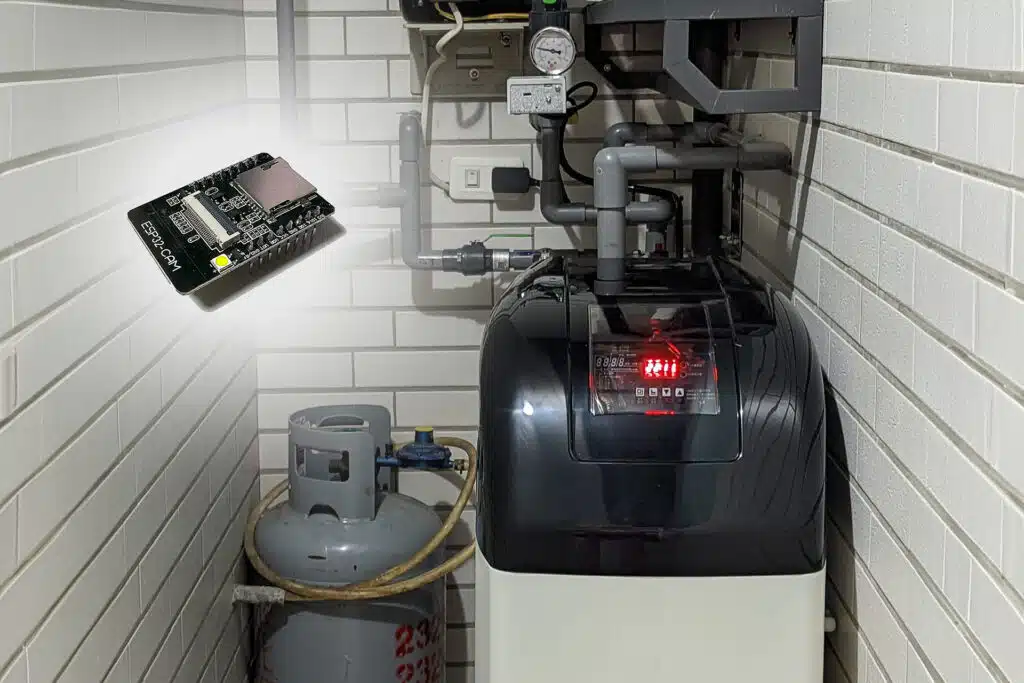
在ESP32_CAM裝完CameraWebServer,確定能連線之後,就拿到現場把它固定上去。我是拿釘槍釘了一個L型的木板,再用3M雙面膠固定,軟水機的黑色外蓋蓋上後,再蓋上一層布阻擋外界光源避免干擾讀值,從外觀上是看不出什麼差異的。
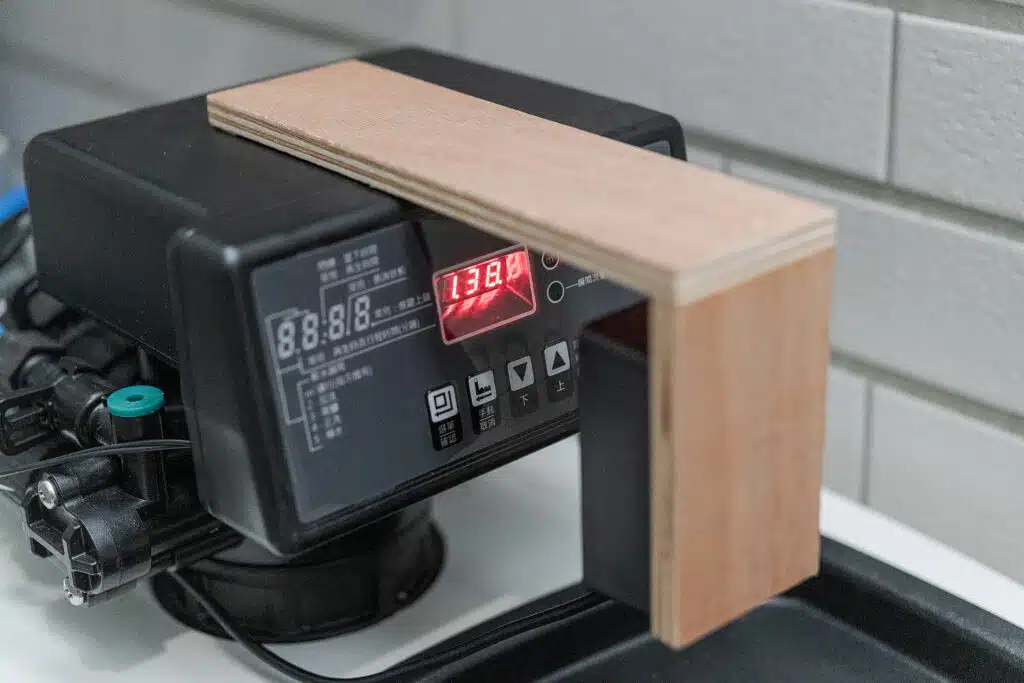
因為要固定ESP32_CAM的地方濕氣較重一些,且下方就是軟水機鹽桶,所以我找了個電子材料行都會賣的黑色小盒子把ESP32_CAM裝進去固定,打個洞讓鏡頭露出來就好。

Python程式碼的修改
主程式main()的部分,分為四個步驟,以while True包起來,就可以不斷地執行直到人為停止或出錯。這四個步驟依序為
- capture_image() 從ESP32_CAM拍照
- process_image() 處理ESP32_CAM拍到的照片變成適合分析的黑白影像
- analyze_image() 分析處理後的黑白影像並讀取位元數字
- publish_result() 將結果透過MQTT發佈
我會在每個步驟都留下一些日誌做為除錯用,但如果每個步驟都使用logging.info一次,一個循環下來的日誌可能會有很多行,不利於閱讀。因此,我將日誌設置為廣義變數log,每個循環都會從空字串不斷地增寫內容,直到每個循環結束前才進行 logging.info 操作,這樣一個循環只會有一行日誌,會更方便閱讀。例如
2024-02-03 22:43:31,117 - Iteration 0 / Captured / M3.Max 0 / 233, 010 / Wrong data format
2024-02-03 22:43:43,068 - Iteration 1 / Captured / M3.Max 0 / 400, 010 / Wrong data format
2024-02-03 22:43:55,971 - Iteration 2 / Captured / M3.Max 133 / 149, 111 / 1.49
2024-02-03 22:44:07,335 - Iteration 3 / Captured / M3.Max 135 / 149, 111 / 1.49
變數run定義的是現在程式已經跑過幾個循環,run最後會跟著remain_volume一起透過MQTT發送出去,當成一個程式是不是還有在執行的參考。
import json
import time
import logging
from logging.handlers import TimedRotatingFileHandler

# 設定logging及定義廣域變數log為空字串
logging.basicConfig(level=logging.INFO,
                    format='%(asctime)s - %(message)s',
                    handlers=[TimedRotatingFileHandler(filename='log.txt', when='D', interval=1, backupCount=5)])
log = ""

def main(run = 0):
    global log # 引入廣域變數log
    while True: # 無限循環執行以下程式碼
        log = (f'Iteration {run}')
        image = capture_image() # 從ESP32_CAM拍照
        try:
            if image: # 若有回傳照片
                processed_image = process_image(image) # 處理ESP32_CAM拍到的照片變成適合分析的黑白影像
                result = analyze_image(processed_image, run) # 分析處理後的黑白影像並讀取位元數字
                if result: # 若回傳的結果存在
                    json_result = json.dumps(result, indent=4) # 將result整理成json格式
                    publish_result(json_result) # 透過MQTT發佈結果
                    json_result = json.loads(json_result)
                    log = log + f' / {json_result["remain_volume"]}'
            logging.info(log) # 寫入log
        except Exception as e: # 若在上面try的部分出現錯誤
            logging.error(f"Exception occurred: {e}. Restarting...") # 寫入error log並重新啟動程式
            python = sys.executable
            os.execl(python, python, *sys.argv)
        run += 1
        time.sleep(10) # 每個循環間暫停10秒
capture_image()是透過requests向ESP32_CAM請求拍照後,利用response.status_code來判斷請求是否有成功,成功的話會將照片存下來方便除錯並回傳到主程式main(),目前執行二天還沒遇過請求失敗的例子,但有因為無線網路不穩定的關係造成請求超時,這時如果沒傳回空值(return None)讓程式繼續往下走,這支程式可能就會停著不動。
ESP32_CAM如果裝的是範例CameraWebServer的話,拍照的網址是ip後面加上/capture。
import requests

capture_url = "http://192.168.88.41/capture"
timeout = 5

def capture_image():
    global log
    try:
        response = requests.get(capture_url, timeout=timeout) # 發出拍照的請求
        if response.status_code == 200: # 請求成功
            with open('Capture.jpg', 'wb') as f:
                f.write(response.content)
            log = log + " / Captured"
            return 'Capture.jpg' # 回傳照片
        else: # 請求失敗
            log = log + " / Failed"
            return None # 回傳空值
    except requests.exceptions.RequestException as e: # 請求超時
        log = log + " / TimeOut"
        return None # 回傳空值
process_image()會將照片做裁切、調整亮度與對比,方便後面做影像辨識用,最後回傳一個處理過的黑白影像並存檔,前文有提到這裡就不贅述。
2024/02/05更新:若出現image file is truncated (13 bytes not processed)的錯誤訊息,代表圖檔已經毀損,程式會自己跳開。解法有以下二種
- 從Pillow匯入ImageFile,設定強制讀入毀損的檔案。
- 圖檔都是ff d8開頭和ff d9結尾,在毀損的圖檔末端加個ff d9讓它可以被讀取。
我選第一個做法,加入
from PIL import ImageFile
ImageFile.LOAD_TRUNCATED_IMAGE = True
更新後的程式碼為
from PIL import Image
from PIL import ImageFile
import numpy as np

ImageFile.LOAD_TRUNCATED_IMAGE = True

crop_area = (190, 135, 425, 210)
brightness_offset = 70
contrast_factor = 5

def process_image(image):
    bw_image = Image.open(image).crop(crop_area).convert("L") # 開啟影像、裁切和轉黑白
    average_brightness = np.mean(np.array(bw_image))
    bw_image = Image.eval(bw_image, lambda x: max(0, x - average_brightness - brightness_offset) * contrast_factor) # 處理亮度
    bw_image.save('Process.jpg')
    return bw_image
analyze_image()會將處理過的黑白影像做辨識並在符合預期的情況下回傳辨識後的值,原理大部分在前文有提到,不過實作上遇到一些問題
- mark_3的亮度和位置不夠穩定,若指定單一座標可能會誤判,所以除了給定一個座標之外,另外再給一個以此座標為中心的搜尋範圍,利用三個for loop來找出這個範圍內單一像素的最大亮度,再將最大亮度與mark_3的亮度閥值做比較,判斷mark_3是否存在。
- 各種干擾可能會造成每個位元數字的0/1組合無法映射到正確的位元數字上,最後返回原本七位數的0/1組合,若要排解這種狀況,需判定映射後的位元數字長度是否為1,是的話就代表有成功映射。不過這種情況並不多見。
digit_offset = 50
digit_1_coordinate = [(28, 27), (14, 34), (39, 34), (26, 46), (12, 56), (37, 56), (24, 64)]
digit_2_coordinate = [(x + digit_offset, y) for x, y in digit_1_coordinate]
digit_3_coordinate = [(x + digit_offset*2, y) for x, y in digit_1_coordinate]
mark_1_coordinate = [(42, 64)]
mark_2_coordinate = [(141, 64)]
mark_3_coordinate = [(208, 14)]
brightness_threshold = 200
brightness_threshold_mark3 = 50
search_range_mark3 = 10

def analyze_image(image, run):
    global log
    result = {}

    # 檢查每個數字的亮度
    for i, coordinates in enumerate([digit_1_coordinate, digit_2_coordinate, digit_3_coordinate], start=1):
        digit_value = 0
        for coord in coordinates:
            brightness = get_brightness(image, coord)
            if brightness > brightness_threshold:
                digit_value = (digit_value << 1) | 1
            else:
                digit_value = (digit_value << 1)
        binary_digit = bin(digit_value)[2:].zfill(7)
        result[f"digit_{i}"] = binary_digit

    # 檢查標記1和標記2的亮度
    for i, coordinates in enumerate([mark_1_coordinate, mark_2_coordinate], start=1):
        brightness = get_brightness(image, coordinates[0])
        if brightness > brightness_threshold:
            result[f"mark_{i}"] = 1
        else:
            result[f"mark_{i}"] = 0

    # 檢查標記3的亮度
    max_brightness = 0
    for x, y in mark_3_coordinate:
        for i in range(x - search_range_mark3, x + search_range_mark3):
            for j in range(y - search_range_mark3, y + search_range_mark3):
                brightness = get_brightness(image, (i, j))
                if brightness > max_brightness:
                    max_brightness = brightness
    log = log + f' / M3.Max {max_brightness}'
    if max_brightness > brightness_threshold_mark3:
        result["mark_3"] = 1
    else:
        result["mark_3"] = 0

    # 將 binary_digit 映射到相應的數字
    for key, value in result.items():
        if "digit" in key:
            if value == "0010010":
                result[key] = 1
            elif value == "1011101":
                result[key] = 2
            elif value == "1011011":
                result[key] = 3
            elif value == "0111010":
                result[key] = 4
            elif value == "1101011":
                result[key] = 5
            elif value == "1101111":
                result[key] = 6
            elif value == "1010010":
                result[key] = 7
            elif value == "1111111":
                result[key] = 8
            elif value == "1111011":
                result[key] = 9
            elif value == "1110111":
                result[key] = 0
    log = log + f' / {result["digit_1"]}{result["digit_2"]}{result["digit_3"]}, {result["mark_1"]}{result["mark_2"]}{result["mark_3"]}'

    # 判斷結果是否符合預期
    if len(str(result["digit_1"])) == 1 and len(str(result["digit_2"])) == 1 and len(str(result["digit_3"])) == 1:
        if result["mark_1"] == 1 and result["mark_2"] == 1 and result["mark_3"] == 1:
            return {"iteration": run, "remain_volume": f"{result['digit_1']}.{result['digit_2']}{result['digit_3']}"}
        else:
            log = log + " / Wrong data format"
            return None
    else:
        log = log + " / Wrong digit format"
        return None

def get_brightness(image, coordinates):
    return image.getpixel(coordinates)
最後publish_result()會將訊息上傳至MQTT伺服器,詳情在前文「以Debian系統資訊為例實作Home Assistant MQTT sensor」裡有提到。
import paho.mqtt.client as mqtt

mqtt_broker = "192.168.88.112" # 填入MQTT伺服器IP
mqtt_port = 1883
mqtt_topic = "digit_reader/watersoften" # 填入想發佈時用的topic
mqtt_username = "" # 填入MQTT使用者名稱
mqtt_password = "" # 填入MQTT使用者密碼

def publish_result(result):
    client = mqtt.Client()
    client.username_pw_set(mqtt_username, mqtt_password)
    client.connect(mqtt_broker, mqtt_port)
    client.publish(mqtt_topic, payload=result, retain=True)
    client.disconnect()
完整的Python程式碼為
import sys
import os
from PIL import Image
from PIL import ImageFile
import json
import numpy as np
import paho.mqtt.client as mqtt
import requests
import time
import logging
from logging.handlers import TimedRotatingFileHandler

ImageFile.LOAD_TRUNCATED_IMAGE = True
logging.basicConfig(level=logging.INFO,
                    format='%(asctime)s - %(message)s',
                    handlers=[TimedRotatingFileHandler(filename='log.txt', when='D', interval=1, backupCount=5)])
log = ""

capture_url = "http://192.168.88.41/capture"
timeout = 5

crop_area = (190, 135, 425, 210)
brightness_offset = 70
contrast_factor = 5
brightness_threshold = 200
brightness_threshold_mark3 = 50
search_range_mark3 = 10

digit_offset = 50
digit_1_coordinate = [(28, 27), (14, 34), (39, 34), (26, 46), (12, 56), (37, 56), (24, 64)]
digit_2_coordinate = [(x + digit_offset, y) for x, y in digit_1_coordinate]
digit_3_coordinate = [(x + digit_offset*2, y) for x, y in digit_1_coordinate]
mark_1_coordinate = [(42, 64)]
mark_2_coordinate = [(141, 64)]
mark_3_coordinate = [(208, 14)]

mqtt_broker = "192.168.88.112"
mqtt_port = 1883
mqtt_topic = "digit_reader/watersoften"
mqtt_username = "mqtt"
mqtt_password = "mqtt2kny67k3"

def main(run = 0):
    global log
    while True:
        log = (f'Iteration {run}')
        image = capture_image()
        try:
            if image:
                processed_image = process_image(image)
                result = analyze_image(processed_image, run)
                if result:
                    json_result = json.dumps(result, indent=4)
                    publish_result(json_result)
                    json_result = json.loads(json_result)
                    log = log + f' / {json_result["remain_volume"]}'
            logging.info(log)
        except Exception as e:
            logging.error(f"Exception occurred: {e}. Restarting...")
            python = sys.executable
            os.execl(python, python, *sys.argv)
        run += 1
        time.sleep(10)

def capture_image():
    global log
    try:
        response = requests.get(capture_url, timeout=timeout)
        if response.status_code == 200:
            with open('Capture.jpg', 'wb') as f:
                f.write(response.content)
            log = log + " / Captured"
            return 'Capture.jpg'
        else:
            log = log + " / Failed"
            return None
    except requests.exceptions.RequestException as e:
        log = log + " / TimeOut"
        return None

def process_image(image):
    bw_image = Image.open(image).crop(crop_area).convert("L")
    average_brightness = np.mean(np.array(bw_image))
    bw_image = Image.eval(bw_image, lambda x: max(0, x - average_brightness - brightness_offset) * contrast_factor)
    bw_image.save('Process.jpg')
    return bw_image

def analyze_image(image, run):
    global log
    result = {}
    for i, coordinates in enumerate([digit_1_coordinate, digit_2_coordinate, digit_3_coordinate], start=1):
        digit_value = 0
        for coord in coordinates:
            brightness = get_brightness(image, coord)
            if brightness > brightness_threshold:
                digit_value = (digit_value << 1) | 1
            else:
                digit_value = (digit_value << 1)
        binary_digit = bin(digit_value)[2:].zfill(7)
        result[f"digit_{i}"] = binary_digit

    for i, coordinates in enumerate([mark_1_coordinate, mark_2_coordinate], start=1):
        brightness = get_brightness(image, coordinates[0])
        if brightness > brightness_threshold:
            result[f"mark_{i}"] = 1
        else:
            result[f"mark_{i}"] = 0

    max_brightness = 0
    for x, y in mark_3_coordinate:
        for i in range(x - search_range_mark3, x + search_range_mark3):
            for j in range(y - search_range_mark3, y + search_range_mark3):
                brightness = get_brightness(image, (i, j))
                if brightness > max_brightness:
                    max_brightness = brightness
    log = log + f' / M3.Max {max_brightness}'
    if max_brightness > brightness_threshold_mark3:
        result["mark_3"] = 1
    else:
        result["mark_3"] = 0

    for key, value in result.items():
        if "digit" in key:
            if value == "0010010":
                result[key] = 1
            elif value == "1011101":
                result[key] = 2
            elif value == "1011011":
                result[key] = 3
            elif value == "0111010":
                result[key] = 4
            elif value == "1101011":
                result[key] = 5
            elif value == "1101111":
                result[key] = 6
            elif value == "1010010":
                result[key] = 7
            elif value == "1111111":
                result[key] = 8
            elif value == "1111011":
                result[key] = 9
            elif value == "1110111":
                result[key] = 0
    log = log + f' / {result["digit_1"]}{result["digit_2"]}{result["digit_3"]}, {result["mark_1"]}{result["mark_2"]}{result["mark_3"]}'

    if len(str(result["digit_1"])) == 1 and len(str(result["digit_2"])) == 1 and len(str(result["digit_3"])) == 1:
        if result["mark_1"] == 1 and result["mark_2"] == 1 and result["mark_3"] == 1:
            return {"iteration": run, "remain_volume": f"{result['digit_1']}.{result['digit_2']}{result['digit_3']}"}
        else:
            log = log + " / Wrong data format"
            return None
    else:
        log = log + " / Wrong digit format"
        return None

def get_brightness(image, coordinates):
    return image.getpixel(coordinates)

def publish_result(result):
    client = mqtt.Client()
    client.username_pw_set(mqtt_username, mqtt_password)
    client.connect(mqtt_broker, mqtt_port)
    client.publish(mqtt_topic, payload=result, retain=True)
    client.disconnect()

if __name__ == "__main__":
    main()
可以得到
{
    "iteration": 613,
    "remain_volume": "1.40"
}
Home Assistant的接入
要將remain_volume做為實體,並將iteration存成remain_volume的attribute,一個MQTT sensor就足夠了。
sensor:
  - name: Water_Softener_Remain_Volume
    state_topic: "digit_reader/watersoften"
    value_template: "{{ (value_json.remain_volume | float) *1000 }}"
    unit_of_measurement: "L"
    json_attributes_topic: "digit_reader/watersoften"
    json_attributes_template: "{{ value_json | tojson }}"
    force_update: true
若是將一天的remain_volume做相減可以得到一天的用水量當參考,先設定二個input_number代表一天的初始值與一日用水量。
water_softener_remain_volume_daystart: #初始值
  name: Water_Softener_Remain_Volume_DayStart
  min: 0
  max: 6000
  unit_of_measurement: "L"
water_softener_1day_used: #一日用水量
  name: Water_Softener_1Day_Used
  min: 0
  max: 6000
  unit_of_measurement: "L"
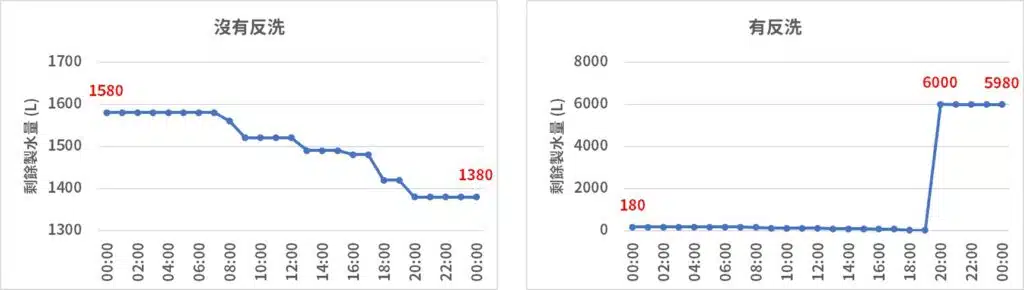
再用automation在23:59時計算一天的用水量,若當天沒有反洗,用水量就是當天00:00的初始量與23:59的讀值做相減,若有反洗,還要注意反洗後的最大製水量為何。參考下圖,左邊是沒有反洗的例子,一日用水量就是1580 – 1380 = 200,右邊是有反洗的例子,一日用水量就是(180 – 0) + (6000 – 5980) = 200。
automation這樣寫
- alias: Information:Calculate_Water_Softener_1Day_Used # 在23:59時將一日用水量記錄在input_number.water_softener_1day_used
  trigger:
    - platform: time
      at: "23:59" # 23:59時啟動
  action:
    - service: input_number.set_value
      data:
        entity_id: input_number.water_softener_1day_used
        value: >
          {% if states.sensor.water_softener_remain_volume.state > states.input_number.water_softener_remain_volume_daystart.state %}
            {{ states.input_number.water_softener_remain_volume_daystart.state | float + 6000 - states.sensor.water_softener_remain_volume.state | float }}
          {% else %}
            {{ states.input_number.water_softener_remain_volume_daystart.state | float - states.sensor.water_softener_remain_volume.state | float }}
          {% endif %}
  mode: queued

- alias: Information:Reset_Water_Softener_Remain_Volume_Daystart # 在00:00時將一日用水量記錄在input_number.water_softener_1day_used
  trigger:
    - platform: time
      at: "00:00" # 00:00時啟動
  action:
    - service: input_number.set_value # 將初始量以現在的讀值做覆蓋
      data:
        entity_id: input_number.water_softener_remain_volume_daystart
        value: "{{ states.sensor.water_softener_remain_volume.state }}"
  mode: queued
Lovelace的部分,我用這樣呈現
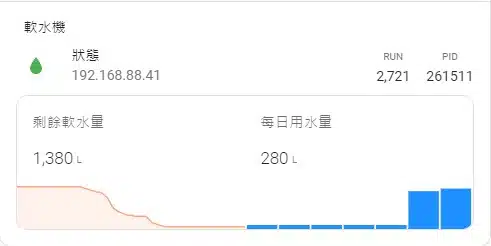
狀態有device_tracker偵測ESP32_CAM的IP位址以及是否還在線上、RUN是從MQTT sensor的attribute抓出來的,以及執行這支Python程式的Process ID。每日用水量的趨勢圖用上了custom:mini-graph-card的aggregate_func和group_by的功能。
type: entities
entities:
  - entity: device_tracker.esp32_31def0
    type: custom:multiple-entity-row
    icon: mdi:water
    name: 狀態
    state_color: true
    show_state: false
    secondary_info:
      attribute: ip
    tap_action:
      action: none
    entities:
      - entity: sensor.water_softener_remain_volume
        attribute: iteration
        name: RUN
      - entity: sensor.pythonstatus_digit_reader_ws
        name: PID
  - type: custom:vertical-stack-in-card
    horizontal: true
    cards:
      - type: custom:mini-graph-card
        entities:
          - entity: sensor.water_softener_remain_volume
            name: 剩餘軟水量
            color: lightsalmon
        font_size_header: 12
        font_size: 50
        hours_to_show: 24
        points_per_hour: 6
        line_width: 3
        show:
          icon: false
      - type: custom:mini-graph-card
        entities:
          - entity: input_number.water_softener_1day_used
            name: 每日用水量
            color: dodgerblue
        font_size_header: 12
        font_size: 50
        hours_to_show: 168
        aggregate_func: max
        group_by: date
        show:
          graph: bar
          icon: false
其中sensor.pythonstatus_digit_reader_ws是一個command_line sensor,透過ssh得到Process ID。
- sensor:
    name: PythonStatus_Digit_Reader_WS
    command: "ssh -i /config/.ssh/id_rsa_debian -o StrictHostKeyChecking=no -q tzungshiun@192.168.88.113 'ps -ef | grep digit_reader_ws.py' | grep python3"
    value_template: "{{ value.split()[1] }}"
    scan_interval: 600